
Photo image warps
In urban landscape photos, vertical lines of building walls often are inclined or curved. The Perspective Pilot program allows you to straighten the lines, making your photos more attractive.
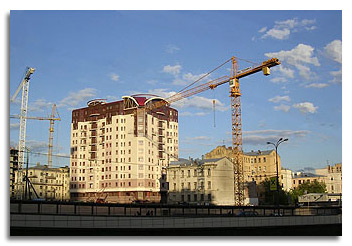 |
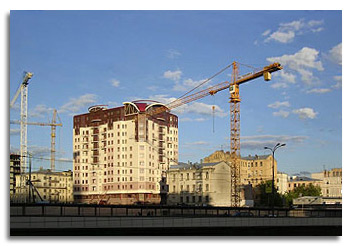 |
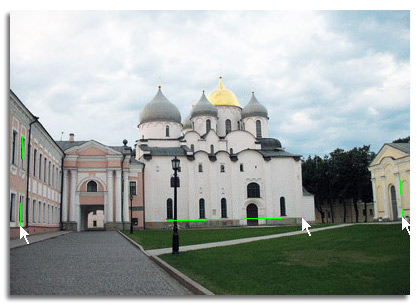
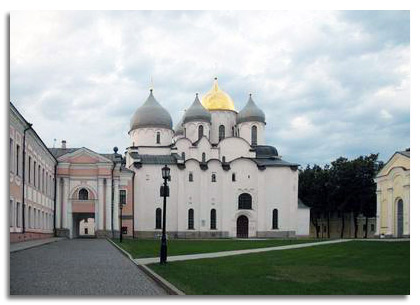
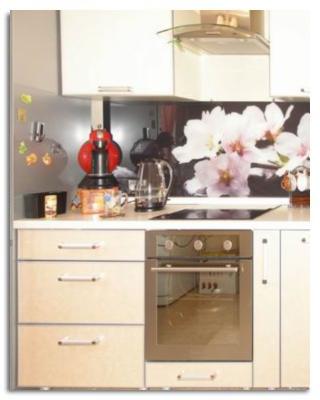
| Original image | Corrected Image |
Let us review why geometric warps appear on photo images. Basic geometric warps relate to distortion, perspective, and rotation.
Distortion
When distortion takes place, edges of objects that are straight in nature appear curved.
Distortion does not affect sharpness; it just misrepresents the objects’ shapes.
Distortion types: |
||
 |
 |
 |
Original image |
Pincushion distortion |
Barrel distortion |
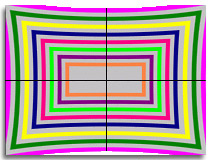
Image distortion is caused by a nonlinear radius mapping from the object to the image. Photographic objectives exhibit barrel distortion at extremely short focal distances, and pincushion distortion at extremely long focal distances. Specially constructed objectives with non-spherical lengths allow capturing an image without the distortion effect. For distortion, axial symmetry is common. Horizontal and vertical axes, which going through the center of an image, are not distorted.
Rotation
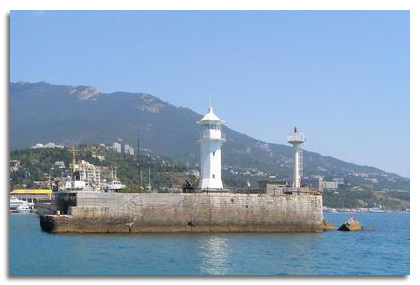
Humans can measure an object canted on a photo by eye quite exactly. Even a slight slope of the horizon line looks wrong. If the camera in an operator’s hands was inclined from the vertical / horizontal line while taking the image, objects on the photo will be unnaturally canted; the image will require correction.
Perspective
The perspective shown in a photo is related to the projection of three-dimensional objects onto an image plane. For instance, you are standing on the ground and taking a photo of a building. The low floors are nearer to you and so look wider than the high floors. So, when photographed, the walls of the building appear inclined. That is how perspective works.
Perspective correction on a photo image is the changing of inclined lines which are straight or vertical in reality (walls, columns). Note that the slope of such lines does not warp properly. So, if you correct those inclined lines to be absolutely straight, the image would look unnatural.
A light slope of the building’s walls or of other high vertical objects shows the space perspective; it is not a warp of the image.
Correction of geometric warps with Perspective Pilot
1. Correction steps
Perspective Pilot allows you to align objects on your urban landscape images, thereby making the photos more attractive.
The following order is recommended for perspective correction on reference lines:
The following order is recommended for perspective correction on the four-points:
Distortion should be corrected first because the warping is objective-induced. Then the rotation should be processed to correct a balk slope of objects on the photo. Then it is perspective’s turn.
Perspective transformations regarding vertical and horizontal objects can be processed in any order. However, if there has been rotation based on a vertical line, for correction of all vertical lines the perspective transformation regarding vertical objects is required. Alternatively, if there has been rotation based on a horizontal line, for correction of all horizontal lines the perspective transformation regarding horizontal objects should be processed.
Note that with Perspective Pilot, software distortion and perspective geometric features are corrected by the same tool. In this way the corrected image is a result of one-step instead of two-step processing. It leads to increased quality of the resulting image and allows decreasing of the cut edge areas.
2. Correction of distortion
2.1. Correction of distortion in automatic mode
Distortion is the objective-induced warping; it depends on focal distance. Distortion can be corrected automatically. EXIF data is used to detect the manufacturer and type of the camera, as well as the focal distance used to take the photo.
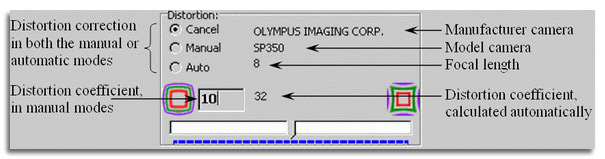
After calibration, distortion correction can be processed automatically using the focal distance of another image and the correction parameter for the camera determined during calibration.
If the automatic mode of distortion correction is unavailable, you can calibrate your camera by yourself. You should print a test image and then take calibration photos using two extreme focal lengths — the shortest and the longest. Distance from the camera to the taken image should allow the image to be fit into the photo frame.
Run Perspective Pilot and process the distortion correction. Then press Alt+F2 and the distortion coefficient for the camera and focal length indicated in the EXIF data will be saved in a PerspectivePilot.dis file. For more details see the "Camera calibration" demonstration example.
2.2. Manual correction of distortion
When processing an image with Perspective Pilot software, you should trace control lines along curved objects.
The farther straight objects are placed from the center, the more they are curved. Therefore, when correcting distortion, you should choose the longest straight lines at the edge areas of the image.
|
 |
| Original image | Corrected image |
Steps for distortion correction:
- Turn on the manual mode of correction.
- Set the distortion coefficient so that all curved lines become straight while processing the image.
- Process the rotation and perspective transformations.
- In the final step of correction, you should press the Refinement button. Then, using the control lines, check if all straight lines on a photo are really straight. If not, process the distortion correction again.
3. Image rotation
For rotation processing you should trace a line along a vertical or a horizontal object.
|
 |
| Original image | Corrected image |
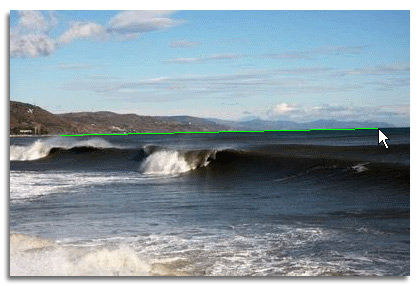
To determine whether the image requires canting correction, check the slope of objects in the central area of the photo. Objects placed in the central area of the photo are less distorted.
If the central vertical/horizontal objects are not canted, then canting correction is not required. Slope of the vertical or horizontal objects in the edge areas of the image can be caused by perspective and/or distortion warping.
If the central vertical/horizontal objects are canted with the same slope angle, you should process the canting correction. Before rotation processing, we recommend measuring the angles of the horizon canting and of the slope of a central vertical object. For correction you should choose the object with the least slope angle. Trace the control line along the object and the program will rotate the image so that the line will be straight (vertical or horizontal). For canting correction, it is enough to trace a line on the photo that should be horizontal or vertical.
There can be several horizontal and vertical lines with various canting angles on a photo. For the canting correction you should measure the angles of horizon canting and of a vertical object in the center. Trace the line with the lesser variation off the vertical or horizontal value as a control line for correction.
If after rotation processing the lines indicated as controls have not become straight (vertical or horizontal), you can cancel the processing and then repeat the correction.
In the example photo (below), the image is warped by perspective distortion and canting.
 |
 |
| Original image | Corrected image |
Corrections to the photo should be applied in the following sequence.
- Choose tool: "Perspective correction on reference lines".
- Trace control lines along the horizon line and the vertical object. Measure their canting angles. Canting of the vertical object is less than that of the horizon line.
- Apply the rotation correction, indicating a reference line along the vertical object.
- Apply the perspective correction, by specifying a reference line along the horizon.
4. Adjustment mode
When pressing the Ctrl button in reference line mode, the coordinates will automatically be adjusted to the most contrasting boundary of the object in the image. The program detects the most contrasting edge of the object and the drawn line is adjusted to the desired position.
This mode is intended to:
- Accelerate the user experience by setting reference lines more quickly.
- Improve the quality of the transformation because the coordinates of the reference lines are accurately determined by the image.
5. Perspective correction on reference lines
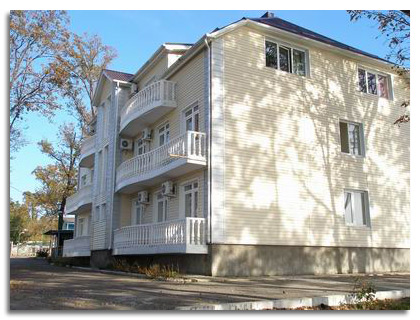
If the photo image of a high building was taken from the ground near the building, walls can appears too inclined. In this case the perspective correction of the image on the base of vertical lines of the building edges is required.
For perspective correction, you must use the mouse for the reference line, the slope of which you want to straighten. For better result, trace lines in the edge areas of the photo.
In general, for perspective correction it is enough to trace two vertical and two horizontal lines.
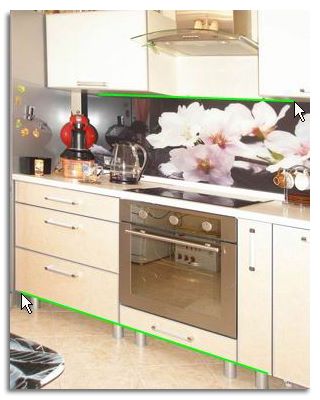
 |
 |
| Original image | Corrected image |
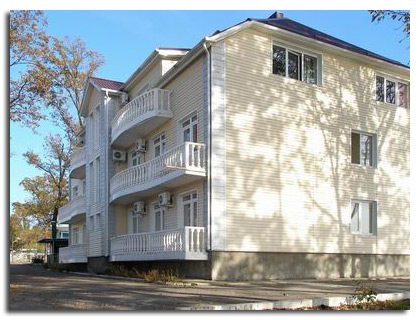
While tracing the reference lines, use the Ctrl key to adjust the lines along edges of objects.
After you set one or two vertical reference lines and transform the perspective to adjust to them, all vertical objects must straighten. If this does not happen, the conversion should be undone by clicking the Undo button and executed again.
Sometimes it is better not to correct inclined lines to straight (horizontal or vertical). The perspective coefficient allows you to adjust the degree of straightening of the reference lines to make your photos more natural.
 |
 |
Original image |
Corrected image |
Note that if you trace the control lines on a photo along the object that is inclined in reality (Pisa tower, for example), the processing of perspective correction on the basis of your control lines will cause image warping.
After you set one or two horizontal reference lines and transform the perspective to them, all horizontal objects must straighten. If this does not happen, the conversion should be undone by clicking the Undo button and executed again.
6. Perspective correction on the four-points
If the photo shows a rectangular object in perspective, then to correct the perspective, you must specify the four vertices of the rectangle. Choose tool: "Four-points perspective correction".
The reference points are specified by mouse click in any order. The four-points perspective correction can only be performed if the reference points are the vertices of a convex quadrilateral. If you specify more than four points, the program will perform the conversion to four corner points.
Mistakenly set points can be removed by mouse click. In addition, when the left mouse button is pressed and moved, a segment specifying two control points will be set. In the segment mode, you can press the Ctrl key to adjust the lines along edges of objects.
The best result is achieved by setting reference points in the edge areas of the photo.
 |
 |
Original image |
Corrected image |
After specifying four points, for a quick preliminary calculation of the image, click "Apply", all vertical and horizontal objects should straighten. If this does not happen, the conversion should be undone by clicking the "Undo" button and executed again.
7. Completion phase
The resulting image may be cut and zoomed. After pressing Refinement, the program processes the color adjustment. When you save the corrected image, the color adjustment is processed automatically.