Photo Composition Rules

“If you, an artist, the one who cannot manage figures,
you look like an orator who cannot manage words.”
Leonardo da Vinci

Photography Composition – Your Photo as a Story

What is a photograph? It is a story. What is a story? It is is a series of sentences connected to each other. The same is true about photography. To create a photograph, it is not enough just to take an image of something. The first impression from a photograph is determined by the composition balance of an image.

To increase the expressiveness of your digital pictures, apply the picture composition rules while taking the photos or modeling their edges.
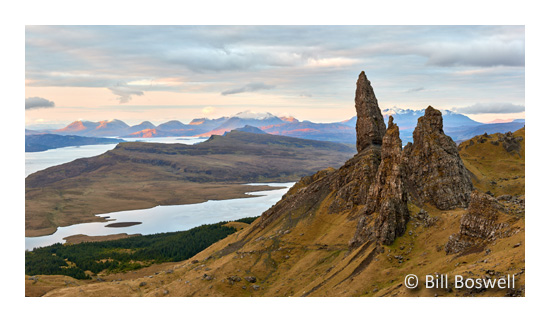
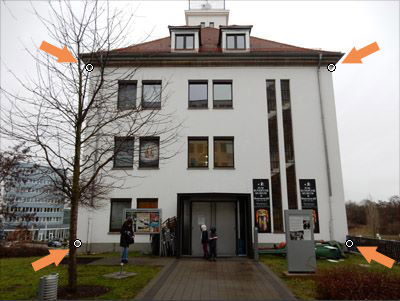
 

Rule of Thirds

The Rule of Thirds is based on the fact that the human eye is naturally drawn to a point about two-thirds up a page. Crop your photo so that the main subjects are located around one of the intersection points rather than in the center of the image:

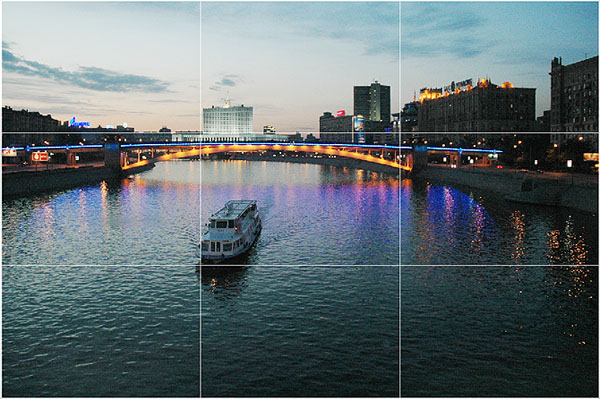
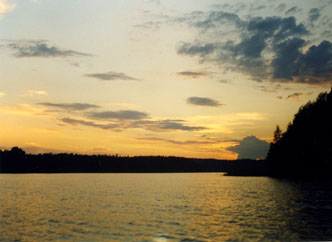
Your landscapes will be optimally pleasing to the eye if you apply the Rule of Thirds when you place your horizon line. If the area of interest is land or water, the horizon line will usually be two-thirds up from the bottom. Alternately, if the sky is the area of emphasis, the horizon line may be one-third up from the bottom, leaving the sky to take up the top two-thirds of the picture:


Golden Section Rule

It has been found that certain points in a picture’s composition automatically attract the viewer’s attention. Similarly, many natural or man-made objects and scenes with certain proportions (whether by chance or by design) automatically please us. Leonardo da Vinci investigated the principle that underlies our notions of beauty and harmony and called it the Golden Section. Long before Leonardo, however, Babylonian, Egyptian, and ancient Greek masters also applied the Golden Section proportion in architecture and art.

To get a clearer sense of these special “Golden” composition points, imagine a picture divided into nine unequal parts with four lines. Each line is drawn so that the width of the resulting small part of the image relates to that of the big part exactly as the width of the whole image relates to the width of the big part. Points where the lines intersect are the “golden” points of the picture:
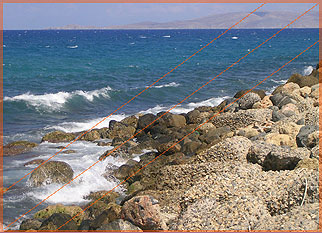


Diagonal Rule

One side of the picture is divided into two, and then each half is divided into three parts. The adjacent side is divided so that the lines connecting the resulting points form a diagonal frame. According to the Diagonal Rule, important elements of the picture should be placed along these diagonals:


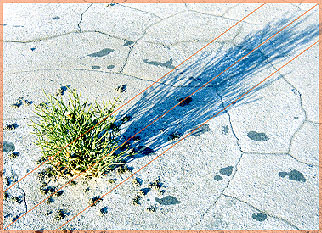
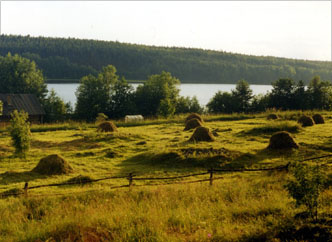
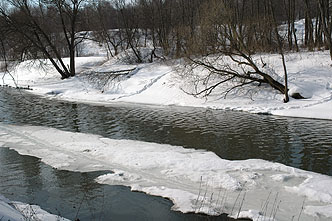
Linear elements, such as roads, waterways, and fences placed diagonally, are generally perceived as more dynamic than horizontally placed ones:


Tips for Beginners

  • Hold your camera at the main object’s level. Taking a picture from above or below brings in the photo an element of exertion.
  • Ordinarily, the main source of light should be placed behind you. To take a picture with the light between you and the object is the task for a specialist.
  • Use a dark background for taking a picture of a light object, or, alternatively, a light background for doing so of a dark object. Note though, that the absolutely white background causes flare effect that leads to reducing the contrast of a taken picture.
  • When the main object of an image is located on the long shot, the whole image will look better if the foreground objects will be taken into the image as well.
  • A space in a shot should be reserved in front of an actually or potentially moving object.
  • Don’t be afraid of breaking rules! As Edward Weston said, “Consulting the rules of composition before taking a photograph is like consulting the laws of gravity before going for a walk.”


The Two Pilots team wishes you having excellent photos!

See our line of digital photo software.

How to correct perspective of document photos captured by a mobile phone camera

Documents taken by a mobile phone camera often have perspective distortions:

Documents taken by a mobile phone camera often have perspective distortions

Perspective Pilot, with its “Perspective correcton on reference lines” tool will help you to correct the photographed document. Open the image in the program. Select “Perspective correcton on refernce lines” tool from the Tools panel.

Perspective correcton on refernce lines

To achieve better results, apply this tool several times.

1. Draw a line along a text string in the middle of the document. After you release the mouse button, the program will rotate the image accordingly:

Correct perspective in the document photo, step 1

2. Now, specify the border line of the left edge of the paper:

Correct perspective in the document photo, step 2

3. Specify the border line of the top edge of the paper:

Correct perspective in the document photo, step 3

4. Specify the border line of the bottom edge of the paper:

Correct perspective in the document photo, step 4

The perspective distortion is corrected. Before and after:

Correct perspective in the document photo, step 4


– Perspective Pilot main page –

Virtual Printer Driver – printing from “Google Chrome” and “Microsoft Edge”

Typically, printing applications such as MS Word and Notepad output text with text output commands. In this case, the print job contains text and the output PDF file will contain text.

Unfortunately, some applications, during the printing process, render the text in the internal buffer and output it as a bitmap image. For example, this is how Google Chrome and Microsoft Edge browsers work.

If you print an HTML, TEXT or PDF document from Google Chrome and Microsoft Edge browser, the print job will contain bitmap output commands instead of text. The virtual printer cannot extract text from this print job because it is not there. Therefore, you cannot search through the resulting document, and if you print to a text file, the resulting .txt file will be empty.

However, FireFox browser will print the content of your file as text. This can help you solve the printing problem.


– Virtual Printer Driver main page –

How to fix distorted floor plan with Perspective Pilot

If your profession is somehow related to real estate floor plans, our software Perspective Pilot might help you a lot. In particular if you use to make photos of floor plans. Architectural drawings that are photographed usually come with distortion:

Photographed floor plans usually come with distortion

Perspective Pilot, with its “Four-points perspective correction” tool will help you to correct the floor plan. Open the image in the program. Select “Four-points perspective correction” tool from the Tools panel and point the four corners of the largest distorted rectangle in the image:

Photographed floor plans usually come with distortion

Click the “Apply” button. Result:

Photographed floor plans usually come with distortion


– Perspective Pilot main page –

How to change orientation of a JPG image without rotating it?

Sometimes we need to change orientation of a JPG image. One simple way is just to rotate it in an image editor. However, in this process your JPG image needs to be re-encoded. As a result, your image losses quality.

The other way to change orientation is to change EXIF metadata of a photo. In this process, no re-encoding is required.
 

How edit orientation meta tag in Exif Pilot:

1. Open Exif Pilot.

2. Browse to select your JPG image.

3. Select the “Exif” tab, go to the “Image” section and find “Orientation”:

How to change orientation of a JPG image in Exif Pilot

4. Double-click on “Orientation”. In the opened window, select one of the options:

How to change orientation of a JPG image in Exif Pilot

5. Click OK.

You’ve managed it to rotate JPG without loosing quality.
 

Example from our user:

Making Panorama stitch
 
“Just wanted to say thank you for creating Exif Pilot. I was trying to do a pano stitch and 1 NEF image was showing as oriented the wrong way. This meant that Capture One could not create the pano at all. Exif Pilot fixed it and the pano works great.”

Bill Boswell


Exif Pilot lets you edit about 7600 different image meta tags. With Exif Pilot & Batch Editing Plug-in, you can change orientation of a JPG image or edit any other meta tag in a batch mode. More about Exif Pilot…

Restore Damaged Photos in minutes

Retouch Pilot costs now 29.95 EUR only! (Old price – 39.95 EUR)

With Retouch Pilot, you can restore damaged photos in minutes, without having any complex knowledge or skills. Here is our “before” and “after” example:

Restore damaged photos - before and after

It took us about 5 minutes to restore the damaged photo above. It was repaired using the two tools: “Scratch Eraser” and “Smart Patch”:

Restoring damaged photo in Retouch Pilot

Retouch Pilot will show you how to repair photo: just click menu – Demonstration and select an example from the list:

How to start demo examples in Retouch Pilot

See the selected live example and try yourself!

For more information, visit the program page: Retouch Pilot…

How to assign your own sounds to your PC keyboard

If you want to add sounds to your computer keyboard, you can use our software Sound Pilot. The program includes a set of sound schemes that you can change according to your mood. Just right-click the program icon and select “Sound Schemes” from the popup menu:

How to choose sound schemes

Be creative and make your own keyboard sounds

However, you can create your own sound scheme using your own sounds. For this purpose, you need:

  • Sounds in .WAV format;
  • Simple text description file that tells Sound Pilot to which keys should your sounds correspond.

Collect your own sounds

There are many possibilities to collect sound effects. If you are good in recording, you can record voice or use electronic piano and other music instruments for creating sound effects.

Alternatively, you can use free sound archives to collect sounds. For example: freesfx.co.uk or freesound.org.

Then you should eventually edit the downloaded sounds (for example, to get the appropriate length) and save them as .wav. You will need an audio editor program, for example Audacity which is completely free. If you use voice records, you can edit voice using a free online audio editor, such as Free Online Voice Changer.
 

Assign your sounds to your Keyboard

Now, you should tell Sound Pilot to which keys should your sounds correspond. Sound Pilot has already a text template file that you can use as a base for your own sound scheme. For further information, please visit our page: How to create sound schemes for Sound Pilot.
 

– Sound Pilot main page –

OrgPilot – manage all your texts in one place!

With our new program OrgPilot, you can manage all your texts in one place. It lets you keep your templates, lists, technical documentation, etc. within touch. You can easily search and retrieve your texts.

OrgPilot applying area

For whom can OrgPilot be useful?

  • For technical support department in each company, preferably company of a small or middle size, also for translation centers or for an individual translator to create dictionary or phrases translations, for accountants to easily store and fast retrieve their templates, invoices etc.
  • For managers that have a lot of accounts, logins or passwords.
  • For programmers that want to create their technical documents and to reduce the number of HTML codes for example written by hand every time.
  • For individuals, readers, book lovers, scientists that want to enumerate all the books that they have in their home libraries and maybe to add their description to them!
     

For more infomation, visit the program page:

Perspective Pilot: Four-point perspective correction tool

Users of Pespective Pilot can benefit from the new tool that we added in the last version.

The four-point perspective correction tool lets you correct perspective if your photo shows a rectangular object in perspective. Just select the tool and point the four corners of the object that should be rectangular:

Perspective Correction Tool

Then click the “Apply” button. Result:

Perspective Correction Result

If you mistakenly set a point in a wrong place, just click it again to remove it.

To see life how this tool works, start Perspective Pilot and run the demo example from the Demonstration menu (“Tile”).

Pespective Pilot main page…

We changed to a new design!

We are excited to announce that we have changed to a new design! We didn’t transfer all the pages yet. If you miss any page or any other link, please contact us thus we can help you.