Let me show you the process of creating of a COM component with Visual Studio 2008 using ATL and C++.
First, let’s create a Visual C++/ATL project:
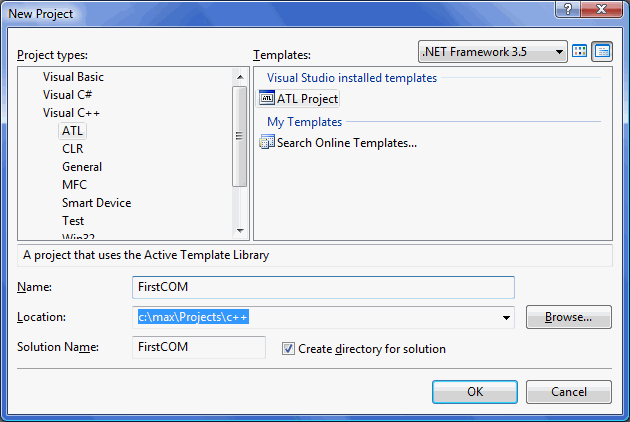
Click “OK” and then select “Allow merging of proxy/stub code”:
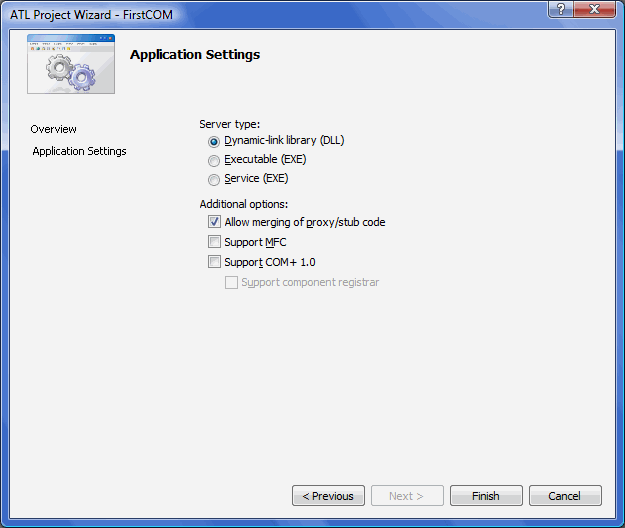
Click “Finish”. Studio creates a project for us. With the help of Solution Explorer, we can see the following files:
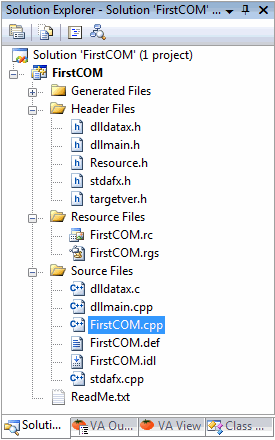
It’s just a shell. If we would compile and build the project at this stage, there would be a DLL-file without a single component.
To add a component to our project, let’s review the “FirstCOM.idl” file. It’s the file that contains the definitions of the interfaces.
So far, this is all that file contains (comments have been removed):
import "oaidl.idl";
import "ocidl.idl";
[
uuid(0652E0B7-4360-4542-8D22-8F52940AEFCE),
version(1.0),
helpstring("FirstCOM 1.0 Type Library")
]
library FirstCOMLib
{
importlib("stdole2.tlb");
};
This means that there is a library of types named FirstCOM that lacks the types. There are two attributes, though, “version” that holds the version of our library and “helpstring” that should hold a description of the library.
Let’s add a component. Select “Add->Class” from the context menu:
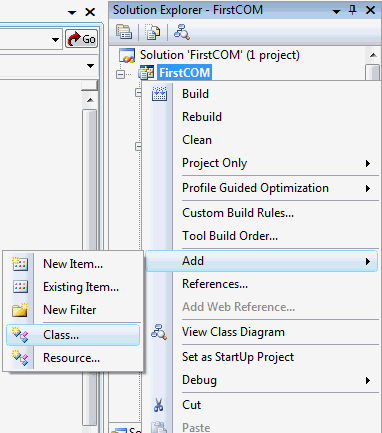
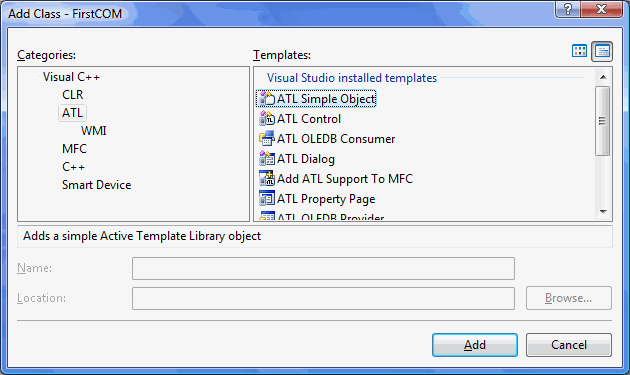
Select “ATL Simple Object”:
Now let’s enter the class information, as illustrated below:
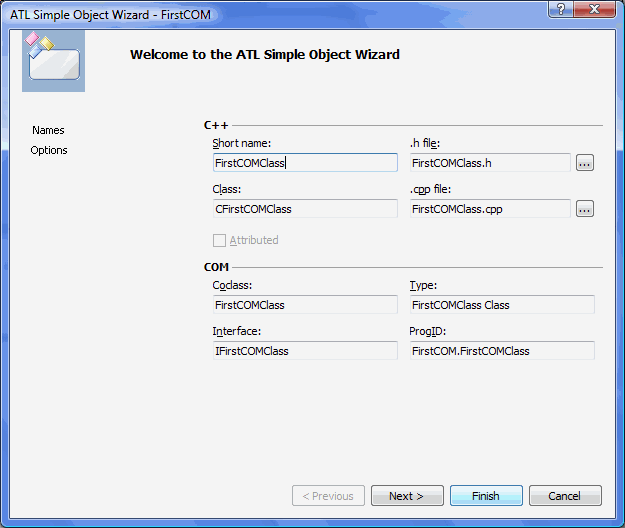
Click “Finish”. Studio will create all the necessary files and add the necessary constants to the resource files. “FirstCOM.idl” should now look like this:
import "oaidl.idl";
import "ocidl.idl";
[
object,
uuid(5F9CB782-BDE1-48E3-91CC-E8EC0280EFA0),
dual,
nonextensible,
helpstring("IFirstCOMClass Interface"),
pointer_default(unique)
]
interface IFirstCOMClass : IDispatch
{
};
[
uuid(FD0B5C1A-6E02-4EFA-958B-046A0AD17381),
version(1.0),
helpstring("FirstCOM 1.0 Type Library")
]
library FirstCOMLib
{
importlib("stdole2.tlb");
[
uuid(61A52F01-320D-41E4-B5F2-A59C6E220292),
helpstring("FirstCOMClass Class")
]
coclass FirstCOMClass
{
[default] interface IFirstCOMClass;
};
};
We have added a description of a class (component) with some interface IFirstCOMClass to the description section of the library (library FirstCOMLib{…}). The definition of that interface has been automatically added at the beginning of the file.
Now we have created a component (class) FirstCOMClass and declared its interface (IFirstCOMClass). This interface will be used to provide access to our component.
Now let’s define methods and functions for our component. For instance, let’s add two methods, one that would return the sum of two numbers and one to return the length of a string. Also, we’ll add a property “Author” to allow read and write access. To do that, in the section
interface IFirstCOMClass : IDispatch
{
};
we should add definitions of our methods and properties:
interface IFirstCOMClass : IDispatch
{
[id(1)] HRESULT CalcSumm([in] LONG lParam1, [in] LONG lParam2,
[out, retval] LONG* retVal);
[id(2)] HRESULT GetStringLen([in] BSTR strParam,
[out, retval] LONG* retVal);

[propget, id(3)]
HRESULT Author([out, retval] BSTR* retVal);
[propput, id(3)]
HRESULT Author(BSTR strValue);
};
Where:
[id(N)] – defines the identification number of a method or a property (This number must be unique.);
[in] denotes an input parameter;
[out, retval] – denotes an output parameter.Important: The read properties and the write properties should have the same name and identification (id).
Now let’s declare the methods described in CFirstCOMClass. Locate the “CFirstCOMClass.h” and open it. There is this:
class ATL_NO_VTABLE CFirstCOMClass :
public CComObjectRootEx<CComSingleThreadModel>,
public CComCoClass<CFirstCOMClass, &CLSID_FirstCOMClass>,
public IDispatchImpl<IFirstCOMClass, &IID_IFirstCOMClass,
&LIBID_FirstCOMLib, /*wMajor =*/ 1, /*wMinor =*/ 0>
This declaration allows the compiler to bind the COM class and its interface with a real C++ class.
Add this to the public section:
public:
STDMETHOD(CalcSumm)(LONG lParam1, LONG lParam2, VARIANT_BOOL* retVal);
STDMETHOD(GetStringLen)(BSTR strParam, VARIANT_BOOL* retVal;
STDMETHOD(get_Author)(BSTR* sVal);
STDMETHOD(put_Author)(BSTR sVal);
It is recommended to declare a constructor and a destructor and then move their implementation into file “CFirstCOMClass.cpp”.
Important: The read and write accessor methods of the property “Author” must begin with the “get_” and “put_” prefixes.
Then we create the private section. Here we will hold the value of the “Author” property.
private:
CComBSTR m_author;
In “CFirstCOMClass.cpp”:
// FirstCOMClass.cpp : Implementation of CFirstCOMClass
#include "stdafx.h"
#include "FirstCOMClass.h" // CFirstCOMClass CFirstCOMClass::CFirstCOMClass()
{
// initial value of the property Author
m_author = OLESTR("Vasya");
}CFirstCOMClass::~CFirstCOMClass()
{
}

STDMETHODIMP CFirstCOMClass::CalcSumm(LONG lParam1, LONG lParam2, LONG* retVal)
{
// if pointer is invalid – return error
if (!retVal)
return S_FALSE;
*retVal = lParam1 + lParam2;

// no errors – return OK
return S_OK;
}

STDMETHODIMP CFirstCOMClass::GetStringLen(BSTR strParam, LONG* retVal)
{
// if pointer is invalid – return error
if (!retVal)
return S_FALSE;

CComBSTR str(strParam);
*retVal = (LONG)str.Length();

// no errors – return OK
return S_OK;
}

STDMETHODIMP CFirstCOMClass::get_Author(BSTR* retVal)
{
// if pointer is invalid – return error
if (!retVal)
return S_FALSE;

// don’t forget to allocate memory for the result string
*retVal = SysAllocString((BSTR)m_author);

// no errors – return OK
return S_OK;
}

STDMETHODIMP CFirstCOMClass::put_Author(BSTR newVal)
{
CComBSTR newAuthor(newVal);
m_author = newAuthor;

// no errors – return OK
return S_OK;
}
Our COM library is almost ready. We have created the library itself, a class, and its interface. We’ve also added the implementation of the interface. It would be great to know the name of our COM library and its class. Their names are in the “FirstCOMClass.rgs”. Open it and find “VersionIndependentProgID”:
VersionIndependentProgID = s 'FirstCOM.FirstCOMClass'
The name of our library is FirstCOM, and the class is “FirstCOM.FirstCOMClass”.
When we add more classes, for each there will be an “.rgs” file with the following text:
VersionIndependentProgID = s 'FirstCOM._class_name_'
After building the project, in the “Debug” or “Release” folder we will find “FirstCOM.dll”, our COM library. To use it from another computer, it must be registered in its operating system. That can be done with an installer or with this command:
regsvr32 FirstCOM.dll
Now, let’s check whether it works. Create a text file “test.vbs” and copy the following Visual Basic Script into it:
' create COM object, use library name and class name
Set comObj = CreateObject("FirstCOM.FirstCOMClass") ' test CalcSumm method
res = comObj.CalcSumm(1, 2)
WScript.Echo "1 + 2 = " & res' test GetStringLen method
res = comObj.GetStringLen("QwertY123")
WScript.Echo "Len = " & res

‘ read property Author
auth = comObj.Author
WScript.Echo “Author = ” & auth

‘ read property Author
comObj.Author = “Petya”
auth = comObj.Author
WScript.Echo “Author = ” & auth

‘ cleanup
Set comObj = Nothing
Save and launch the file this way:
wscript.exe test.vbs
or this:
cscript.exe test.vbs
If we did everything correctly, we should see the results of our tests.
We could execute it from PHP:
<?php
// create COM object, use library name and class name
$comObj = new COM("FirstCOM.FirstCOMClass") or die("Can't create COM.");
// test CalcSumm method
$res = $comObj.CalcSumm(1, 2);
echo("1 + 2 = " . $res);
// test GetStringLen method
$res = $comObj.GetStringLen("QwertY123");
echo("Len = " . $res);

// read property Author
$auth = $comObj.Author;
$echo(“Author = ” . $auth);

// read property Author
$comObj.Author = “Petya”;
$auth = $comObj.Author;
echo(“Author = ” . $auth);

// cleanup
$comObj = null;
?>
Max Filimonov.
