
Home Download Pricing FAQ Manual Tutorials Known issues News
Here you can find different examples how to use our virtual printer technology in your applications. We illustrate the examples with code in C++.
- How to get information from printer into your client application
- How to create your own pre-converter application
- How to create your own post-converter application
- How to create your own post-converter application that is compatible with Early-Access mode
- How to get and set printer paper orientation
- How to create, add, set, enumerate, get and remove paper form for specified printer
- How to get, set and enumerate papers bin for specified printer
- How to get, set and enumerate print resolutions for specified printer
- How to enumerate papers form info for specified printer
- How to get and set DEVMODE for specified printer
- How to enumerate printers in the system
- How to start, stop, get current state and enum dependencies for specified Windows service
- How to set, get and remove settings for main Virtual Printer Driver features
1. How to get information from printer into your client application
After you send your document to the printer, it creates an INI file that stores all required information about print job and output files:
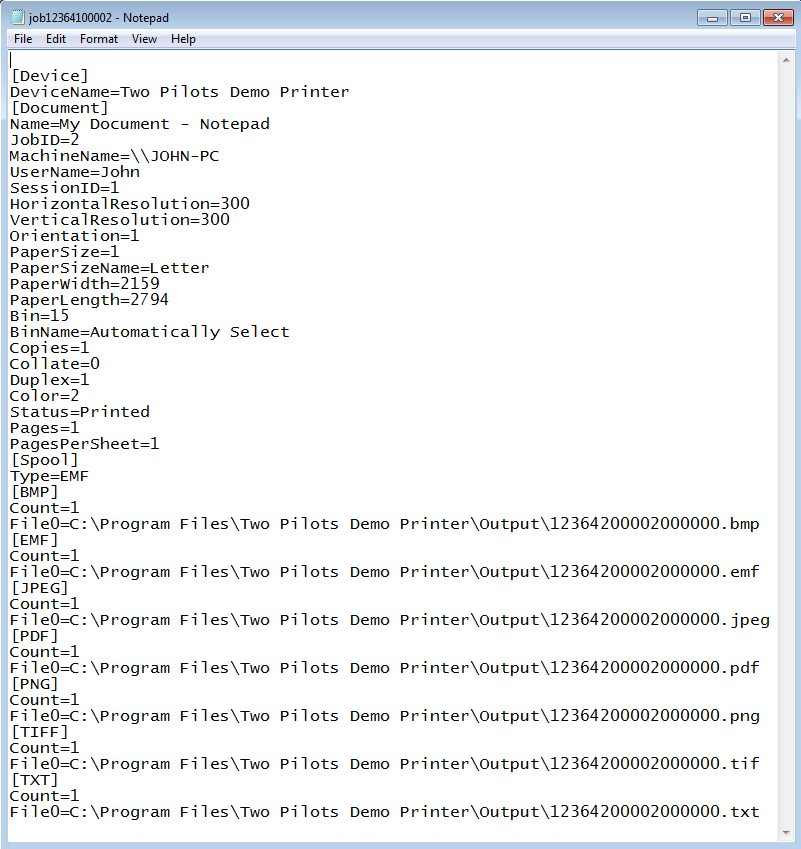
The INI file may passed to your application through command line, named pipe or WM_COPYDATA message, for more details see the documentation.
For reading information from INI file we recommend you to use WinAPI calls:
GetPrivateProfileInt for reading integer value from INI file:
[C++ code]
// Gets paper width and paper length values from [Document] section
void foo(WCHAR const *pathToIniFile){
  int width = GetPrivateProfileInt(L"Document", L"PaperWidth", 0, pathToIniFile);
  int length = GetPrivateProfileInt(L"Document", L"PaperLength", 0, pathToIniFile);
}
GetPrivateProfileString for reading string value from INI file:
[C++ code]
// Gets device name from [Device] section and document name from [Document] section:
void boo(WCHAR const *pathToIniFile){
  DWORD const size = 256;
  WCHAR deviceName[size] = {0};
  WCHAR documentName[size] = {0};
  GetPrivateProfileString(L"Device", L"DeviceName", L"", deviceName, size, pathToIniFile);
  GetPrivateProfileString(L"Document", L"Name", L"", documentName, size, pathToIniFile);
}
2. How to create your own pre-converter application
Pre-converter is an application that Virtual Printer Driver calls before EMF files conversion.
Create you own pre-converter if you want to:
- Process EMF files before printing them, for example, edit them
- Set custom settings of the EMF conversion
- Decide on each particular print job whether it is accepted or rejected for printing
Using pre-converter you are able to process the EMF files as necessary and change some Virtual Printer Driver settings such as output formats, watermarks, output directory and others except device settings (paper size, resolution, orientation, etc.). All these settings are stored in Registry. For more Information, see the documentation.
The pre-converter input and output are the following:

Virtual Printer Driver calls the pre-converter passing the path to the INI file with the print job properties. According to your needs, you can configure Virtual Printer Driver to send the INI file path to the pre-converter through the command line, named pipe or WM_COPYDATA message.
How pre-converter works
Virtual Printer Driver receives the print job, extracts the EMF files, pauses its processes, calls the pre-converter and does not resume until the pre-converter either updates the print job status or simply closes.
The INI file in the pre-converter step looks like this:
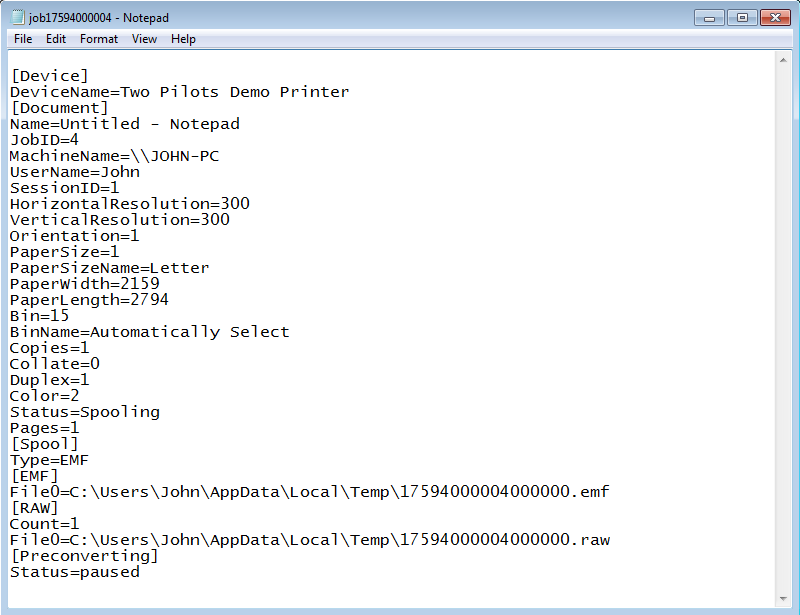
The INI file provides the paths to all the EMF files in [EMF] section of the file and the print job status in [Preconverting] section.
After the EMF files are processed and the Virtual Printer Driver is set up, the pre-converter should update the print job status in the INI file.
To accept the print job, set “Status” to “resumed” value in the INI file:
[Preconverting]
Status=resumed
To reject the print job, set “Status” to “canceled” value in the INI file:
[Preconverting]
Status=canceled
Note that right after the pre-converter updates the INI file, Virtual Printer Driver resumes its processes. So if the pre-converter updates the status before EMF processing, Virtual Printer Driver will probably use them in their initial state as the pre-converter does not have time to change them.
Setting up pre-converter
Set up the pre-converter for Virtual Printer Driver according to the Application Settings section.
Pre-converter Example 1
Let’s create a simple console pre-converter application that receives the path to the INI file through the command line and decides to continue conversion process if “HorizontalResolution” and “VerticalResolution” are less than or equal to 300 and paper size is less than or equal to 2286 x 3048 in tens of mm (9” x 12”).
The example source Code and Visual Studio 2013 solution are available here.
[C++ code]
#include <Windows.h>

int wmain(int argc, WCHAR const *argv[]){
  if (argc != 2)
    return 1;

  WCHAR const *pathToIniFile = argv[1];

  int horzRes = GetPrivateProfileInt(L"Document", L"HorizontalResolution", 0, pathToIniFile);
  int vertRes = GetPrivateProfileInt(L"Document", L"VerticalResolution", 0, pathToIniFile);

  int paperWidth = GetPrivateProfileInt(L"Document", L"PaperWidth", 0, pathToIniFile);
  int paperLength = GetPrivateProfileInt(L"Document", L"PaperLength", 0, pathToIniFile);

  if (horzRes > 300 || vertRes > 300 || paperWidth > 2286 || paperLength > 3048){
    // skip conversion
    WritePrivateProfileString(L"Preconverting", L"Status", L"canceled", pathToIniFile);
  }
  else{
    // accept conversion
    WritePrivateProfileString(L"Preconverting", L"Status", L"resumed", pathToIniFile);
  }

  return 0;
}
Pre-converter Example 2
This demo example shows how to modify the contents of EMF files after they have been extracted from a print job. Virtual Printer Driver calls the pre-converter passing the path to the INI file. The pre-converter reads the necessary parameters of the print job from the ini file, such as the size and number of pages, and the names of EMF files. After that, the header of each EMF file is changed so that the content fits the entire page.
The example source Code and Visual Studio 2015 solution are available here.
[C++ code]
#include <Windows.h>
#include <stdio.h>

int APIENTRY wWinMain(HINSTANCE hInstance,HINSTANCE hPrevInstance,LPWSTR lpCmdLine,int nCmdShow){
  int argc=0;
  WCHAR**argv=CommandLineToArgvW(GetCommandLineW(),&argc);
  if (argc != 2)
      return 1;

  WCHAR const *pathToIniFile = argv[1];

  int width  = GetPrivateProfileInt(L"Document", L"PaperWidth", 0, pathToIniFile);
  int length = GetPrivateProfileInt(L"Document", L"PaperLength", 0, pathToIniFile);
  int pages  = GetPrivateProfileInt(L"Document", L"Pages", 0, pathToIniFile);

  ENHMETAHEADER hdr = {0};

  size_t const pathSize = 1024;
  WCHAR path[pathSize] = { 0 };
  size_t const keySize = 16;
  WCHAR key[keySize] = { 0 };
  HANDLE hFile;

  swprintf(key, keySize, L"%i", pages);
  WritePrivateProfileString(L"Preconverting", L"Count", key, pathToIniFile);

  for (DWORD i = 0; i < pages; ++i) {
       swprintf(key, keySize, L"File%i", i);
       GetPrivateProfileString(L"EMF", key, L"", path, pathSize, pathToIniFile);
	   if (wcslen(path)) {
		   hFile =  CreateFile(path, GENERIC_READ | GENERIC_WRITE, FILE_SHARE_READ, NULL, OPEN_EXISTING, FILE_ATTRIBUTE_NORMAL, NULL);
		   if (hFile != INVALID_HANDLE_VALUE) {
			   DWORD countRead, countWrite;
			   if (ReadFile(hFile, &hdr, sizeof(hdr), &countRead, NULL)) {
				   // Set the page size based on the page size in the print job.
				   hdr.rclFrame.right  = width * 10;
				   hdr.rclFrame.bottom = length * 10;
				   // Set the size in millimeters to scale the image to fit the sheet.
				   hdr.szlMillimeters.cx = width / 10;
				   hdr.szlMillimeters.cy = length / 10;
				   SetFilePointer(hFile, 0, NULL, FILE_BEGIN);
                   WriteFile(hFile, &hdr, countRead, &countWrite, NULL);
				   WritePrivateProfileString(L"Preconverting", key, path, pathToIniFile);
			   }
			   CloseHandle(hFile);
		   }
       }
  }
  WritePrivateProfileString(L"Preconverting", L"Status", L"resumed", pathToIniFile);
  return 0;
}
We should set the pre-converter settings for Virtual Printer Driver. To set up our application as the pre-converter, do the following:
- Open Registry and locate the key “HKCU/Software/Two Pilots Demo Printer/Application”.
- In that key, create “Preconverter” key.
- Add the following values to “Preconverter”:
| Value Name | Value Type | Description |
| Enabled | REG_DWORD | Enables or disables the pre-converter. To enable set value to “1”. |
| Executable File | REG_SZ | The full path to the pre-converter application. For example: C:\Program Files\Two Pilots Demo Printer\pre-converter.exe |
| Transfer mode | REG_DWORD | The way the pre-converter receives the INI file path. Set “0” to receive through the command line. |
After that we can use our pre-converter.
Tip:If you want to hide your pre-converter application you should create a Win32 application (not console) and change the main entry:
[C++ code]
int APIENTRY wWinMain(HINSTANCE hInstance, HINSTANCE hPrevInstance, LPWSTR  lpCmdLine, int nCmdShow){
  int argc = 0;
  WCHAR **argv = CommandLineToArgvW(GetCommandLineW(), &argc);

  // here is the same code as in the previous version of the pre-converter application

  LocalFree(argv);
  return 0;
}
3. How to create your own post-converter application
Post-converter is an application that Virtual Printer Driver calls after EMF files conversion.
Create your own post-converter if you want to:
- Process result files after printing
- Show result to your customer
- Get additional information from User and use it for further processing
Using post-converter application you are able to process the result files as necessary.
The post-converter input is the following:

Virtual Printer Driver calls the post-converter passing the path to INI file with the print job properties and paths to result files. According to your needs, you can configure Virtual Printer Driver to send the INI file path to the post-converter through the command line, named pipe or WM_COPYDATA message.
How post-converter works
Virtual Printer Driver receives the print job, extracts the EMF files, process EMF files and calls the post-converter.
The INI file at post-converter step looks like this:
The INI file provides the paths to all the EMF, BMP, JPEG, TIFF, PNG, PDF and Text files in the corresponding sections.
Setting up post-converter
Set up the post-converter for Virtual Printer Driver according to the Application Settings section of the Documentation.
Example
Let’s create a simple console post-converter application, which called default viewer on PNG files.
The example source code and Visual Studio 2013 solution available here.
[C++ code]
#include <Windows.h>
#include <stdio.h>

int wmain(int argc, WCHAR const *argv[]){

  if (argc != 2)
    return 1;

  WCHAR const *pathToIniFile = argv[1];
  DWORD count = GetPrivateProfileInt(L"PNG", L"Count", 0, pathToIniFile);
  if (!count)
    return 0;

  size_t const pathSize = 1024;
  WCHAR path[pathSize] = {0};

  size_t const keySize = 32;
  WCHAR key[keySize] = {0};

  for (DWORD i = 0; i < count ; ++i){
    swprintf(key, keySize, L"File%i", i);
    GetPrivateProfileString(L"PNG", key, L"", path,  pathSize, pathToIniFile);

    if (wcslen(path))
      ShellExecuteW(GetDesktopWindow(), L"open", path, NULL, NULL, SW_SHOWNORMAL);
  }
  return 0;
}
We should set the post-converter settings for Virtual Printer Driver.
To set up our application as the post-converter, do the following:
- Open Registry and locate the key “HKCU/Software/Two Pilots Demo Printer/Application”.
- In that key, create “Postconverter” key.
- Add the following values to “Postconverter”:
| Value Name | Value Type | Description |
| Enabled | REG_DWORD | Enables or disables the post-converter. To enable set value to “1”. |
| Executable File | REG_SZ | The full path to the post-converter application. For example: C:\Program Files\Two Pilots Demo Printer\post-converter.exe |
| Transfer mode | REG_DWORD | The way the post-converter receives the INI file path. Set “0” to receive through the command line. |
After that we can use our post-converter.
Tip: If you want to hide your post-converter application you should create Win32 application (not console) and change the main entry:
[C++ code]
int APIENTRY wWinMain(HINSTANCE hInstance, HINSTANCE hPrevInstance, LPWSTR  lpCmdLine, int nCmdShow){
  int argc = 0;
  WCHAR **argv = CommandLineToArgvW(GetCommandLineW(), &argc);

  // here is the same code as in the previous version of the post-converter application

  LocalFree(argv);
  return 0;
}
4. How to create your own post-converter application that is compatible with Early-Access mode
Early-access is a Virtual Printer Driver mode that allows receiving paths to converted files during the conversion process.
Use Early-Access mode if you want to:
- reduce document processing time
- show results to User as soon as possible
The post-converter input in the Early-Access mode is the following:

How Early-Access works
Virtual Printer Driver receives the print job, calls the post-converter passing path to INI file with the print job properties.
The INI file at this step looks like this:
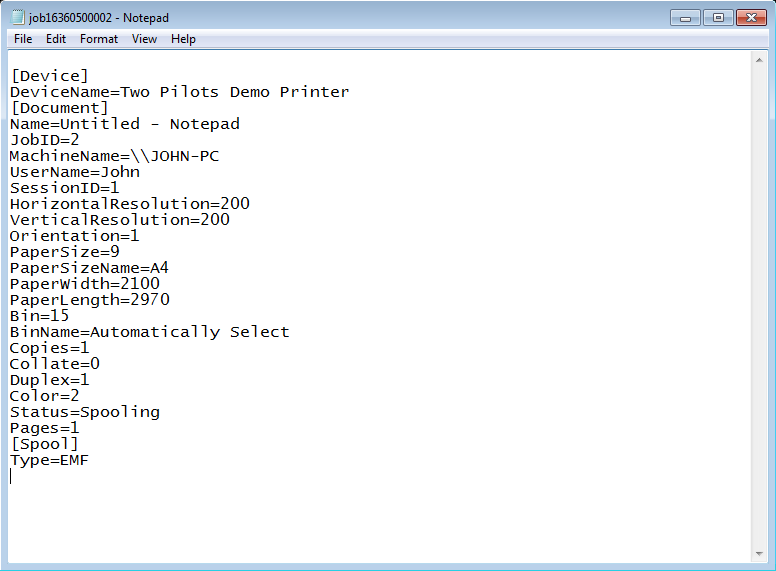
The INI file provides the print job status in [Document] section. At this step it set to “Spooling”.
For each page in the print job, Virtual Printer Driver:
- Extract EMF file
- Process EMF file
- Pass the paths to result files to post-converter
The paths to result files are packed into a package. Each package stores device name, print job ID and paths to result files with zero ('\0') as delimiter and double zero at the end of the package.
For example, package:
“Two Pilots Demo Printer\017\0c:\Output\result.emf\0c:\Output\result.png\0\0”
comes from device “Two Pilots Demo Printer”, job ID is 17 and there are two files “c:\Output\result.emf” and “c:\Output\result.png”.
At the end of conversion, Virtual Printer Driver pass the path to INI file to post-converter. The INI file at this step looks like this:
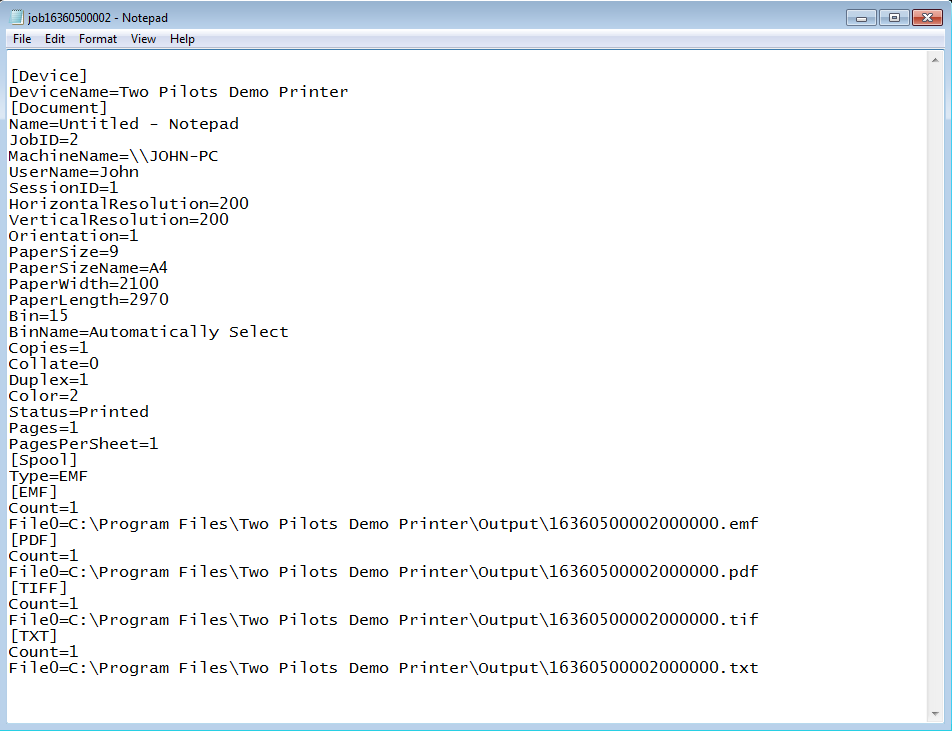
The print job status in [Document] section is set to “Printed”.
Example
Let’s create a Win32 application, which receive data through WM_COPYDATA message and shows BMP file in the default viewer.
The example source code and Visual Studio 2013 solution available here.
Code sample below shows WM_COPYDATA handling in a dialog procedure.
[C++ code]
BOOL CALLBACK DialogProc(HWND hDlg, UINT Message, WPARAM wParam, LPARAM lParam){

  switch(Message){
    case WM_COPYDATA:{
    COPYDATASTRUCT *data = (COPYDATASTRUCT *) lParam;
    // package is an array of strings "value0\0value1\0value2\0…\0\0"
    WCHAR const *package = (WCHAR const *) data->lpData;
    std::wstring fileName(package);

    // Get extension of fileName
    std::size_t index = fileName.rfind('.');
    std::wstring extension = L"";
    if (index != std::string::npos)
      extension = fileName.substr(index + 1);

      if (!_wcsicmp(extension.c_str(), L"ini")){
        // INI-file received.
        // Here we can get print job information and make some changes for VPD settings
      }
      else{
        // paths to converted files received in format "printer name\0job id\0file0\0file1\0…\0\0"
        package += wcslen(package) + 1; // skip header "printer name\0"
        package += wcslen(package) + 1; // skip header "job id\0"

        WCHAR const *ptr = package;
        while (ptr[0]){
          fileName = ptr;
          // find fileName extension
          index = fileName.rfind('.');
          if (index != std::string::npos){
            extension = fileName.substr(index + 1);
            if (!_wcsicmp(extension.c_str(), L"bmp")){ // found BMP file
              images.addImage(fileName);
              updateStatics(hDlg, currentImage, images.getSize(), images.getImage(currentImage).c_str());
              InvalidateRect(hDlg, NULL, TRUE);
              return 0;
            }
          }

          ptr += wcslen(ptr) + 1;
        }
      }

    return 0;
  }

  // …
}
We should set the post-converter settings for Virtual Printer Driver.
To set up our application as the post-converter, do the following:
- Open Registry and locate the key “HKCU/Software/Two Pilots Demo Printer/Application”.
- In that key, create “Postconverter” key.
- Add the following values to “Postconverter”:
| Value Name | Value Type | Description |
| Enabled | REG_DWORD | Enables or disables the post-converter. To enable set value to “1”. |
| Executable File | REG_SZ | The full path to the post-converter application. For example: C:\Program Files\Two Pilots Demo Printer\early-access.exe |
| Transfer mode | REG_DWORD | The way the post-converter receives the INI file path. Set “1” to receive through WM_COPYDATA message. |
| Early Access | REG_DWORD | Enables or disables the Early-Access mode. To enable set value to “1”. |
| Window class | REG_SZ | Class of the component application window. For example, ClientAppClass |
| Window title | REG_SZ | Title of the component application window. For example, ClientAppTitle. |
After that we can use our post-converter in Early-Access mode.
5. How to get and set printer paper orientation
In this sample we use VPD SDK API which is distributed as part of Devkit package, you can download it here.
[C++ code]
#include <vpd_sdk.h>

void paperOrientationTest(std::wstring const &printerName){

  // get paper orientation
  vpd::PaperOrientation result;
  vpd::getPaperOrientation(printerName, result);

  if (result == vpd::PaperOrientationLandscape)
    return;

  // set paper orientation to Landscape mode
  vpd::setPaperOrientation(printerName, vpd::PaperOrientationLandscape);
}
6. How to create, add, set, enumerate, get and remove paper form for specified printer
In this sample we use VPD SDK API which is distributed as part of Devkit package, you can download it here.
[C++ code]
#include <vpd_sdk.h>

void paperFormsTest(std::wstring const &printerName){
  // create new paper form
  vpd::PaperForm testForm;
  wcsncpy_s(testForm.mName, L"test form", vpd::PaperForm::paperFormSize - 1);
  testForm.mWidth = testForm.mHeight = 1234.0f;            // width and height are 1234.0
  testForm.mMeasure = vpd::PaperSizeMeasureMetrics;        // width and height are in metrics
  testForm.mPrecision = vpd::PaperSizePrecisionNormal; // width and height are in normal precision, i.e. mm or inches

  // add paper form to printer forms list
  vpd::addPaperForm(printerName, testForm);

  // set "test form" form for selected printer
  vpd::setPaperForm(printerName, testForm);

  // enumerate paper forms
  vpd::AutoReleasePtr<vpd::PaperForm> forms(0);
  std::size_t size = 0;
  vpd::enumPaperForms(printerName, forms.getRef(), size, vpd::PaperSizeMeasureMetrics);

  vpd::PaperForm form;
  for (std::size_t i = 0; i < size; ++i){
    if (!_wcsicmp(forms[i].mName, L"test form")){
      // get "test form" form parameters
      vpd::getPaperForm(printerName, form);
      break;
    }
  }

  // remove "test form" from printer forms list
  vpd::removePaperForm(printerName, testForm);
}
7. How to get, set and enumerate papers bin for specified printer
In this sample we use VPD SDK API which is distributed as part of Devkit package, you can download it here.
[C++ code]
#include <vpd_sdk.h>

void paperBinTest(std::wstring const &printerName){

  // enumerate paper bins
  vpd::AutoReleasePtr<vpd::PaperBin> bins(nullptr);
  std::size_t size = 0;
  int result = vpd::enumPaperBins(printerName, bins.getRef(), size);

  // get paper bin
  WORD bin = 0;
  vpd::getPaperBin(printerName, bin);

  if (bin == DMBIN_CASSETTE)
    return;

  for (std::size_t i = 0; i < size; ++i){
    if (bins[i].mBin == DMBIN_CASSETTE){
      // set paper bin
      vpd::setPaperBin(printerName, bins[i].mBin);
      break;
    }
  }
}
8. How to get, set and enumerate print resolutions for specified printer
In this sample we use VPD SDK API which is distributed as part of Devkit package, you can download it here.
[C++ code]
#include <vpd_sdk.h>

void resolutionTest(std::wstring const &printerName){
  // get printer resolution
  vpd::PrintResolution resolution;
  vpd::getPrintResolution(printerName, resolution);

  if (resolution.mDpiX <= 300 || resolution.mDpiY <= 300)
    return;

  // enumerate printer resolutions
  vpd::AutoReleasePtr<vpd::PrintResolution> resolutions(nullptr);
  std::size_t size = 0;
  vpd::enumPrintResolutions(printerName, resolutions.getRef(), size);

  for (std::size_t i = 0; i < size; ++i){
    if (resolutions[i].mDpiX <= 300 && resolutions[i].mDpiY <= 300){
      // set printer resolution
      vpd::setPrintResolution(printerName, resolutions[i]);
      return;
    }
  }
}
9. How to enumerate papers form info for specified printer
In this sample we use VPD SDK API which is distributed as part of Devkit package, you can download it here.
[C++ code]
#include <vpd_sdk.h>

void formInfoTest(std::wstring const &printerName){

  // enum forms info for selected printer
  vpd::AutoReleasePtr<FORM_INFO_1> forms(nullptr);
  std::size_t size = 0;

  vpd::enumFormInfo(printerName, forms.getRef(), size);
}
10. How to get and set DEVMODE for specified printer
In this sample we use VPD SDK API which is distributed as part of Devkit package, you can download it here.
[C++ code]
#include <vpd_sdk.h>

void devmodeTest(std::wstring const &printerName){

  // get DEVMODE for specified printer
  vpd::Devmode devmode(vpd::getDevmode(printerName));

  // modify DEVMODE
  devmode->dmFields |= DM_COPIES | DM_COLLATE | DM_DUPLEX;
  devmode->dmCopies = 1;
  devmode->dmCollate = DMCOLLATE_FALSE;
  devmode->dmDuplex = DMDUP_HORIZONTAL;

  // set DEVMODE
  vpd::setDevmode(printerName, devmode);

}
11. How to enumerate printers in the system
In this sample we use VPD SDK API which is distributed as part of Devkit package, you can download it here.
[C++ code]
#include <vpd_sdk.h>

void printerTest(void){
  vpd::AutoReleasePtr<vpd::PrinterInfo> printers(nullptr)
  std::size_t size = 0;

  // enum local printers
  vpd::enumPrinters(vpd::PrinterLocationLocal, printers.getRef(), size);

  for (std::size_t i = 0; i < size; ++i)
    fwprintf(stderr, L"%s\n", printers[i].mName);
}
12. How to start, stop, get current state and enum dependencies for specified Windows service
In this sample we use VPD SDK API which is distributed as part of Devkit package, you can download it here.
[C++ code]
#include <vpd_sdk.h>

void serviceTest(std::wstring const &serviceName){

  // get service current state
  DWORD state = 0;
  vpd::getServiceCurrentState(serviceName, state);

  switch (state){
    case SERVICE_STOPPED:
      // start service
      vpd::startService(serviceName);
      break;

    case SERVICE_RUNNING:
      // stop service
      vpd::stopService(serviceName);
      break;
  }

  // enumerate services that depends on selected service
  vpd::AutoReleasePtr<vpd::ServiceInfo> services(nullptr);
  std::size_t size = 0;
  vpd::enumDependentServices(serviceName, services.getRef(), size);
  for (std::size_t i = 0; i < size; ++i)
    fwprintf(stderr, L"%s\n", services[i].mName);
}
13. How to set, get and remove settings for main Virtual Printer Driver features
Virtual Printer Driver settings stored in the POD structures, for example, text settings structure:
[C++ code]
struct TextSettings{
  unsigned long mEnable;      /**< enable or disable TEXT file format */
  unsigned long mMultipage;   /**< enable or disable multipage */
  TextEncoding mEncoding;     /**< text encoding */
  unsigned long mWriteBOM;    /**< enable or disable BOM in text files */
  unsigned long mSingleLineInterval; /**< set width of an interval on axis OY in which two words are in single line */
  unsigned long mSingleWordInterval; /**< distance between two words which should be in the one word */
  unsigned long mDebug;/**< enable or disable debug output in text files */
  unsigned long mKeepFormatting;/**< enable or disable text formated output */
  unsigned long mDefaultBidirectionalAlgorithm; /**< use default bidirectional algorithm */
  unsigned long mCleanup;/**< remove TEXT files after processing */
};
For each structures VPD SDK API provides set, get and remove methods, for example
[C++ code]
int getTextSettings(TextSettings &settings, unsigned int hive, std::wstring const ®istryKey); int setTextSettings(TextSettings const &settings, unsigned int hive, std::wstring const ®istryKey); int removeTextSettings(unsigned int hive, std::wstring const ®istryKey);
where hive is a registry hive, can be one or more of the following values:
- REGISTRY_HKLM: use HKEY_LOCAL_MACHINE hive;
- REGISTRY_HKCU: use HKEY_CURRENT_USER hive.
if hive contain both of HKLM and HKCU hives then get-method will reads settings from HKCU hive first.
[C++ code]
unsigned int hive = vpd::REGISTRY_HKCU | vpd::REGISTRY_HKLM;
registryKey is a root key for Virtual Printer Driver settings in the selected hive, for example, “Software\\Two Pilots Demo Printer” mean “HKCU\Software\Two Pilots Demo Printer” or “HKLM\Software\Two Pilots Demo Printer”.
In this sample we use VPD SDK API which is distributed as part of Devkit package, you can download it here.
[C++ code]
#include <vpd_sdk.h>

void textSettingsTest(void){
  std::wstring const textRoot = std::wstring(L"Software\\Two Pilots Demo Printer");
  vpd::TextSettings textSettings = {0};

  // get text settings
  vpd::getTextSettings(textSettings, vpd::REGISTRY_HKCU | vpd::REGISTRY_HKLM, textRoot);

  textSettings.mMultipage = 1;
  textSettings.mSingleLineInterval = 10;
  textSettings.mDebug = 1;

  // store text settings in HKLM hive
  vpd::setTextSettings(textSettings, vpd::REGISTRY_HKLM, textRoot);

  // and remove text settings from HKCU hive
  vpd::removeTextSettings(vpd::REGISTRY_HKCU, textRoot);
}
Home Download Pricing FAQ Manual Tutorials Known issues News