
Form Pilot: Main Page Features Download Order Tutorial FAQ News
1. Insert a paper document, which you usually fill out using a typewriter into your scanner.
2. Click File | TWAIN Select Source… to select the scanner you’re using (If you’ve not done so already, otherwise skip this step).
3. Click File | TWAIN Acquire… to open your scanner driver.
4. In the scan dialog, select the area to be scanned so that it contains the top and left edges of the paper, e.g.:
Otherwise, the program will not know the position of the scanned image in relation to the real paper form. If the upper-left corner is invisible, put some black paper under the form.
5. Scan your form and close the scan dialog. A new document will appear in Form Pilot.
6. If your scanned form looks inclined, e.g.:
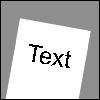
try to re-scan it one more time to make it look straight. If this doesn’t help, you can rotate the form. To do it, make the following:
a) Choose the “Rotation” tool ![]() and mark two points on the image that should lie on a horizontal or vertical line:
and mark two points on the image that should lie on a horizontal or vertical line:

b) Click the “Do transformation” button ![]() to rotate the image.
to rotate the image.
c) If your image is not rotated to the angle you need, you can undo the rotation using the “Undo” command ![]() and repeat steps a) and b).
and repeat steps a) and b).
7. If you need to move the form image to any direction, use the “Move the image” tool: ![]() (you can drag the image using the arrow keys as well).
(you can drag the image using the arrow keys as well).
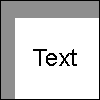
8. Now click the “Text Field” tool ![]() and position the cursor in any space by clicking on it with the mouse:
and position the cursor in any space by clicking on it with the mouse:

Enter your text in the space:

9. To delete an unneeded text field or graphic object, chose the “Delete” option from the context menu by pressing the right button of the mouse. Graphical object can be also deleted with the “Delete” button in the “Select” mode.
10. After filling your form out, you can print either the entered text on a preprinted form, or the entire form on a blank paper.
To print the text you have entered on a preprinted form:
- Insert the paper document into your printer
- Select File | Print…
- Choose the “preprinted form” radiobutton
(if your document is of great importance and you only have one copy of the paper form to fill out, first make sure that the text you have entered will be printed exactly in the right places. Read more…)
To print the entire form together with the text you entered:
- Insert a blank paper into your printer
- Select File | Print…
- Choose the “blank paper” radiobutton.
11. If the text printed on the paper is not in the right places as one sees it on the screen, do the following:
- Use the “Move the image” tool

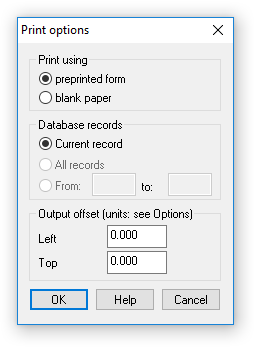
Or: - When you choose the “Print” command, the “Print options” dialog box comes up:

Here you can specify the output offset. This offset can be both positive and negative. Use this offset to get your text and other objects printed in the right place.
12. To save the scanned form with the entered text, click File | Save as… You will be able to open it later and edit the text fields if needed.
Form Pilot: Main Page Features Download Order Tutorial FAQ News